I have had a number of inquiries into my methods of making my deep molds for my Rustic Nature Polymer Clay Pendants. First, I will admit that my molds are rather homely, which is one of the reasons why I haven't attempted to sell the finished molds. I believe a pourable mold making product would make a much nicer looking mold, but my first attempt at a pourable product gave me molds that were softer and mushier than I liked so I will be looking into some other pourable products in the near future.
Meanwhile, here is my mold-making/pendant making system. Ugly, but sturdy.
In the prototype stage you will need polymer clay - I use up old early Sculpey stock for my originals. Early Sculpey is really not strong enough for serious jewelry work, but is great for making prototypes.
A clay rolling tool - I use a section of an old metal arrow shaft.
A pair of even thickness shims to act as your clay thickness guides - Some people use playing cards, matboard etc... Mine are just strips of 1/4 inch plywood.
A clay scraper.
Xacto, or other sharp pointed blade.
Leaves from your garden.
A selection of shape templates - I cut mine from heavy stock plastic, like the kind used in binders. Clear stock is nice as you can see the placement of the template on the leaves.
Roll your conditioned clay to the desired thickness - I like mine thicker since I like to drill my beading hole from side to side. Roll your leaf gently into the flattened clay.
Place the template over the leaf and cut around the template with the Xacto blade. Cut through the leaf and stem. Make sure your blade is sharp so it doesn't 'drag' on the stem and distort the clay. A small up and down 'sawing' motion when you reach the leaf helps too, rather than a pulling cut.
Cure the clay and do any edge finishing/sanding until the piece is the desired finish quality.
Now that you are ready to make molds you will need your completed prototypes.
The mold making product of your choice - I like
Amazing Mold Putty but have also used
Townsend Atelier's product
Knead-a-Mold®
Measuring spoon - I like 1/2 tsp size.
Measure out two equals scoops of the molding product. Amazing Mold Putty comes in Part A and Part B. Usually the two parts are different colors and you knead them together until a consistent color is reached. I work in small quantities since the molding material tends to set up rather quickly. If you mix too much it will set before you can work with it all. I have also discovered through trial and error that trying to push an object into a large blob of the molding material creates a blurred/multiplied image.
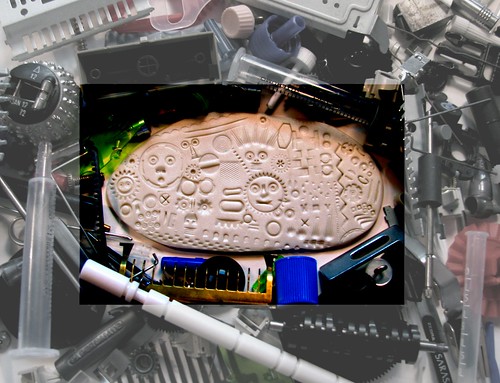
Once blended evenly, and working quickly, flatten out your blob to the approximate dimensions of the 'face' of the piece, but not too thin. At least 3/16 inch thick, 4mm. Starting at one end of the piece and pressing in a gentle forward-moving fan pattern, ease the putty across the face and into the impressions. A flat application tends to trap air which will leave bubble marks on your mold.
Wrap the remaining mold material around the edges - I like to give the corners a little pinch as well. Silicone mold material sticks to itself so my next step is to build up the mold. Mix another blob and give the bottom another layer of thickness to make the mold a little more sturdy. I continue to mix material and wrap the edges and sides, trying to stay as even as I can with the top of the prototype. Trim the top edges with a blade if desired.
Now you have a finished mold and are ready to make some replicas.
You will need your finished molds.
Conditioned polymer clay.
A flat-ended tool for pushing the clay into the mold - I just use the end of my Xacto knife.
Clay scraper.
Freezer - I like to pop my clay into the freezer for a few minutes. You can then pop the clay out of the mold and use the same mold to do a new piece, making many replicas before curing.
Shape a piece of your conditioned clay into a piece approximately the size and shape as your mold, but slightly thicker than the mold is deep. When you put the piece in the mold it will bulge out of the opening a little. Taking a flat-ended object, gently push the clay into the mold. You are trying to make sure that the clay is forced into all of the recesses in the mold. You can leave the surface textured if you like, or trim off top with a clay scraper and smooth the clay. Place in freezer for about 5-10 minutes, then un-mold by gently flexing the edges and putting light pressure on the bottom of the mold.
Clean up the edges before or after curing. Cure the clay as per product instructions and finish as you prefer. I paint mine with heat-setting acrylic paint and sand lightly to give a rustic finish.
Let me know if you give the tutorial a try, and I'd love to see what you make with it!