Monday, April 27, 2009

Thank you Amy from The Peach Tree


Flowers from my garden...as a small Thank You!

When I first started on Etsy I was so impressed by the quality of artwork, quality of promotion, and the high levels of dedication of so many of the people there.

As I became more and more familiar with the site certain artists began to stand out. One of the first people to make a very strong impression on me with her consistent level of artwork and dedication to creating stunning collections in the Treasury was Amy from ThePeachTree. Her skills in quality presentation and promotion make her an admired web entrepreneur.

Amy's distinctive photographic style is easily recognizable. I love her artistic use of focus, lighting and framing.


In addition to Amy's awesome shop she keeps an inspiring and impressive blog, The Peach Tree.

I always enjoy Amy's great taste in her selections of intriguing pieces for her Peach Picks series, full of wonderfully explored subjects and themes. Her *FEATURED ARTIST of the week* series has been a lovely introduction to many inspirational artists. This one is a charming interview with Etsy artist Winklepots. Also enjoyable are glimpses into daily adventures...like row-boating in Central Park, complete with personal snapshots, like this great photo of sunning turtles.


Thank you Amy. I wish you much continued success!

Usefulness


My Mother's parents lived through the Depression. They were hardworking, rural, Pennsylvania folks. I remember vividly, growing up and watching them save everything -repair, re-use and re-purpose until it falls apart. Tools, dishes, fabrics, wood....all acquired a smoothness, a patina, well-worn patching, chips. All spoke of value in the intrinsic usefulness of an item. Looking back, what might have seemed poor and shabby to some speaks to me of honesty and thrift.

When I have to throw away some bit of modern junk that unfortunately cannot be repaired I feel a sadness and a loss of connection.

That is why I treasure a small collection of clothespins that I found at a yard sale. Some are apparently handmade...squared and chamfered, worn smooth by many years of hard-working hands. My favorite however is a simple little pin with evidence of thrift and value. Evidently splitting after many years of use, a single small nail has been hammered through to hold the split. The free end of the nail has been carefully bent over and pushed into the wood to keep it from catching fingers or cloth.

Wednesday, April 22, 2009

Thank you Anabela from BelaDonna!


Anabela from the three sweet Etsy shops BelaDonna, BelaDonnaJewels, and BelaDonnaBeads recently asked me if I would do an artist's interview for her lovely blog, BelaDonna.

Her blog is fun and well written. It combines personal stories and crafting tales with everything from a recipe for Thai Noodles (sounds delicious!), to a demonstration on how she makes her charming Kokeshi Dolls, to regular features like Featured Artist Interviews (this one is Shellie from the wonderful Etsy shop, PillowHappy). Thank you Anabela for the invitation. I am very pleased to be a part of your lovely blog.

Beautiful earrings from BelaDonnaJewels:

Supplies to make your own beauties from BelaDonnaBeads:

Monday, April 20, 2009

Repotted!


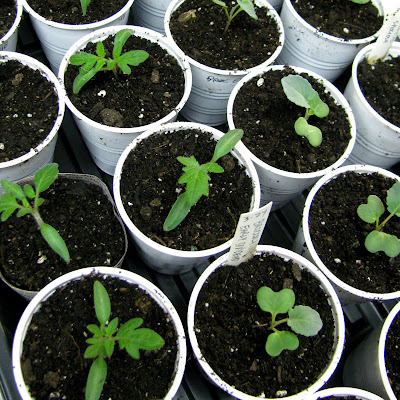
The first batch of seedlings has been re-potted. I made both plastic cup pots, and recycled newspaper pots. I am also watering the seedlings with a dilute fish emulsion fertilizer. They are a lovely deep green and have beautifully stocky stems.

The tomatoes can be potted up buried all the way to the cotyledons, or "seed leaves". New roots can grow from any point on the stem and this will create a deeper, stronger root system.


Making Seedling Pots

The seeds have been doing well under the lights and are in need of transplanting. I make my own re-usable plant pots by drilling drainage holes in 5 oz. plastic cups. In the interest of recycling I decided to try an experiment. In addition to the plastic pots I am gong to make some pots out of recycled newspaper. I want to see how well the newspaper pots hold up, and how well the plants thrive compared to my plastic cup method.

First the plastic cups. I use 5 oz. plastic cups and simply drill holes in the bottom with a Dremel.


For the newspaper pots I purchased a wooden pot making tool. You simply cut newspaper into 3.5" x 10" strips which you wrap around the barrel portion of the tool. I chose to do a double thickness of paper. The bottom of the wrapped paper is folded over and you push it onto the round wheel-shaped form. I gave it a twist and added one staple, just to give it a little extra sturdiness.


The pots felt reasonably sturdy. I appreciated the addition of the staple and the doubling of the paper. I like my pots sturdy. :^)

Friday, April 10, 2009

First True Leaves


The first true leaves have appeared on most of my first batch of seedlings. This means that they are soon ready for re-potting. I am going to try an experiment this year. Every year I use plant pots that I make out of 5 oz. plastic cups. I like them as they are a great size, they fit nicely in the flats, I can write information on them if needed -using a Sharpie, they hold up well, and I can re-use them from year-to-year.

In the interest of recycling and being more eco-friendly I have purchased a plant pot maker that uses strips of newspaper to make biodegradable pots. In the near future I will post a demo on making both kinds of pots. I want to compare how well they stand up and how well the plants thrive. I am not including peat pots as I don't like them. I find they draw too much moisture out of the soil if not kept constantly moist. If peat pots are not removed at planting, and the top edge is above ground, they can wick moisture away from the roots. Others may have good results with peat... I find them too expensive for the uneven results.

Wednesday, April 8, 2009

Progress


Progress, originally uploaded by Lynn_EL/UnaOdd.

They've been taking swimming lessons for maybe 7 months now. He started younger and had little fear. She started older. It was really tough in the beginning -the fear, the tears, the frustration. She's come a long way. I can tell she's proud of herself for how far she's come and I see her confidence growing each time we go.

Here she's waiting her turn to dive in.....