Being a polymer clay jewelry artist, I try to avoid producing work that is heavily focused on a single holiday. I don't like having a lot of stock that has a limited 'season' of use.
My favorite exception to my rule is my little skull pendants. Skulls appeal to some people year round and they are made in the same way as my little head pendants and are so fun to make.
I like to use a minimum of manipulation, preferring to quickly provide just enough detail to - although odd with this subject matter - bring the face to life.

Saturday, September 8, 2012

Wednesday, August 1, 2012
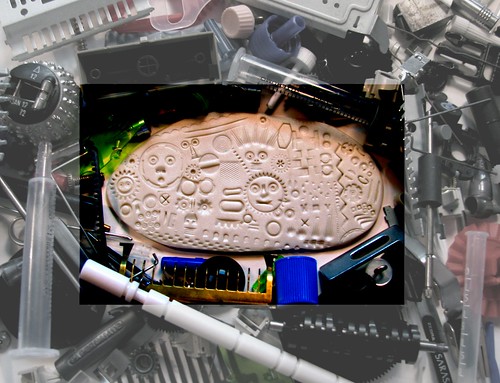
Using Polymer Clay as Printing Plates

Using Polymer Clay as Printing Plates #polymerclay #printmaking #unaodd #instagram, originally uploaded by Lynn_EL/UnaOdd.
It reminded me that somewhere in the recesses of my filing cabinet were some explorations I'd made about 10 or so years ago using uncured polymer clay as printing plates. I was doing freelance work for a greeting card company at the time and was going to propose a series of cards based on this style. I don't remember why I didn't pursue it, but it's been pretty much the template for my art experience. Experiment, don't follow through, move on.
I look forward to seeing where Gen takes her ideas. She seems to work in such a naturally organic way.
Tuesday, July 31, 2012
New Tool Alert - Kiln in Firingplace
I recently took a PMC (precious metal clay) class through The Banana Factory, a wonderful local arts program. The class was taught by a very talented and wonderfully generous jewelry artist named Wendy Schuster. If you are in the Eastern PA region and are ever interested in taking a PMC class, I highly recommend her! A quick Google search brings up many classes she is teaching.
After Wendy's excellent class I was thrilled with the possibilities of the medium, but was frustrated by the limitations and quality issues of torch firing. Having also taken pottery classes in the past, and having an interest in exploring glass and possibly enamels, I thought it was high time I looked into acquiring a kiln. A quick search on Ebay found one up for auction within an hour's drive - which meant the option to forgo shipping costs, which meant more bargaining power in the auction. When the auction finished it was mine!
A day later my kiln was home -with much generosity on the part of the seller as well, who threw in some extra PMC and promised to send her tools and cork-clay when they turn up. While the fireplace in my studio is not to code for building actual fires (the firebox is too shallow), it does however, fit the new kiln perfectly!
The fireplace is now transformed to The Firingplace!
Tuesday, May 22, 2012
Sweet Little Color Break - Faceted Wood Crystals
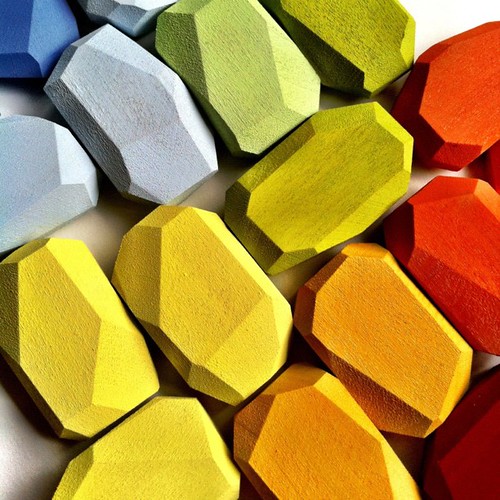
Wood Crystals Closeup #myart #acrylicpaint #wood #faceted #crystal #rainbow #geometric #facets #itswhatido #instagram #unaodd, originally uploaded by Lynn_EL/UnaOdd.
The last two spring days have been gray and rainy, and while that is great for the garden and gives my yard-work sore muscles a rest, it isn't always a boost to the mood.
Nothing like a bright rainbow to brighten the day!
I have an upcoming show, June 9th, at the Bethlehem, PA Ice Rink on Illick's Mill Road. It will be my first time doing the indiemade craft market and these little crystals will be made into magnets.
Hoping for a sunny day for the show! If you're in the area please drop by!
Thursday, March 22, 2012
Ghosts from Machines - Mechanical Textures in Polymer
I really love impressing things into polymer and seeing what the resulting textures say to me. Mostly I work with natural textures - leaves, twigs, feathers, shells, etc...
I do have a deviation from the natural that gives me a lot of enjoyment. I like to salvage and scavenge small bits of man-made materials. Some times it's mechanical - like gears and flywheels, knobs and keys. Other times it's just scraps that have nice shapes - like pen caps, dosing syringes, bread bag ties and hang tags. Anything being discarded gets inspected first for texture possibilities.
Usually when I start impressing I instinctively make faces. They have become their own little line of pendants that I call "Ghosts from Machines".


Wednesday, March 21, 2012
Tutorial -Making my 'ugly' molds for my Rustic Nature Polymer Clay Pendants
I have had a number of inquiries into my methods of making my deep molds for my Rustic Nature Polymer Clay Pendants. First, I will admit that my molds are rather homely, which is one of the reasons why I haven't attempted to sell the finished molds. I believe a pourable mold making product would make a much nicer looking mold, but my first attempt at a pourable product gave me molds that were softer and mushier than I liked so I will be looking into some other pourable products in the near future.
Meanwhile, here is my mold-making/pendant making system. Ugly, but sturdy.
In the prototype stage you will need polymer clay - I use up old early Sculpey stock for my originals. Early Sculpey is really not strong enough for serious jewelry work, but is great for making prototypes.
A clay rolling tool - I use a section of an old metal arrow shaft.
A pair of even thickness shims to act as your clay thickness guides - Some people use playing cards, matboard etc... Mine are just strips of 1/4 inch plywood.
A clay scraper.
Xacto, or other sharp pointed blade.
Leaves from your garden.
A selection of shape templates - I cut mine from heavy stock plastic, like the kind used in binders. Clear stock is nice as you can see the placement of the template on the leaves.

Roll your conditioned clay to the desired thickness - I like mine thicker since I like to drill my beading hole from side to side. Roll your leaf gently into the flattened clay.
Place the template over the leaf and cut around the template with the Xacto blade. Cut through the leaf and stem. Make sure your blade is sharp so it doesn't 'drag' on the stem and distort the clay. A small up and down 'sawing' motion when you reach the leaf helps too, rather than a pulling cut.

Cure the clay and do any edge finishing/sanding until the piece is the desired finish quality.

Now that you are ready to make molds you will need your completed prototypes.
The mold making product of your choice - I like Amazing Mold Putty but have also used Townsend Atelier's product Knead-a-Mold®
Measuring spoon - I like 1/2 tsp size.

Measure out two equals scoops of the molding product. Amazing Mold Putty comes in Part A and Part B. Usually the two parts are different colors and you knead them together until a consistent color is reached. I work in small quantities since the molding material tends to set up rather quickly. If you mix too much it will set before you can work with it all. I have also discovered through trial and error that trying to push an object into a large blob of the molding material creates a blurred/multiplied image.
Once blended evenly, and working quickly, flatten out your blob to the approximate dimensions of the 'face' of the piece, but not too thin. At least 3/16 inch thick, 4mm. Starting at one end of the piece and pressing in a gentle forward-moving fan pattern, ease the putty across the face and into the impressions. A flat application tends to trap air which will leave bubble marks on your mold.

Wrap the remaining mold material around the edges - I like to give the corners a little pinch as well. Silicone mold material sticks to itself so my next step is to build up the mold. Mix another blob and give the bottom another layer of thickness to make the mold a little more sturdy. I continue to mix material and wrap the edges and sides, trying to stay as even as I can with the top of the prototype. Trim the top edges with a blade if desired.

Now you have a finished mold and are ready to make some replicas.
You will need your finished molds.
Conditioned polymer clay.
A flat-ended tool for pushing the clay into the mold - I just use the end of my Xacto knife.
Clay scraper.
Freezer - I like to pop my clay into the freezer for a few minutes. You can then pop the clay out of the mold and use the same mold to do a new piece, making many replicas before curing.

Shape a piece of your conditioned clay into a piece approximately the size and shape as your mold, but slightly thicker than the mold is deep. When you put the piece in the mold it will bulge out of the opening a little. Taking a flat-ended object, gently push the clay into the mold. You are trying to make sure that the clay is forced into all of the recesses in the mold. You can leave the surface textured if you like, or trim off top with a clay scraper and smooth the clay. Place in freezer for about 5-10 minutes, then un-mold by gently flexing the edges and putting light pressure on the bottom of the mold.


Clean up the edges before or after curing. Cure the clay as per product instructions and finish as you prefer. I paint mine with heat-setting acrylic paint and sand lightly to give a rustic finish.
Let me know if you give the tutorial a try, and I'd love to see what you make with it!
Wednesday, March 14, 2012
Golly Bard Love
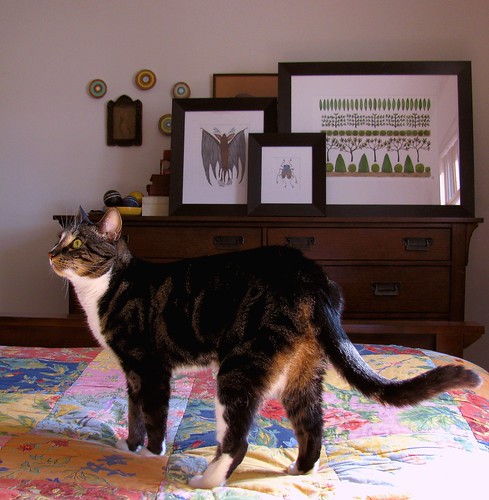
A most splendid Christmas Gift from my husband!
I have long admired the wonderful watercolors of Holly Ward Bimba, watercolor-artist -fantastic, of the Etsy shop Golly Bard. She has quite a lovely blog as well!
Her subject matter is dear to my heart and her style pleasing to my eye.
Birds and eggs and nests...

Twigs and roots and blossoms...

Fancifully filled bottles hold macabre collections...

Crazily-long-legged bugs contort and twist. Decorated with Holly's signature patterns.

What a wonderful Christmas surprise to find not one Golly Bard painting, but THREE! Of course I immediately wanted to write to Holly and thank her for doing such beautiful work, but then I thought it would be so much nicer to frame the pieces first and then post a photo.
Time passes....
Of course such lovely pieces needed to have custom frames, and that took some planning. Then the frames were ordered and they took a few weeks to arrive. Oh yes, I needed to cut mats and actually frame the pieces! I could have waited until they were hung, but I still need eye-hooks and picture framing wire... and you can see how this goes. I thought the time was well overdue - so thank you Holly, for the beautiful work that you do! Thank you Glenny, for bringing such beautiful pieces into our home, and for choosing so well from my favorites!
Kaida agrees too! :^)
Subscribe to:
Posts (Atom)